


How to Make a Professional Website for Free on Blogger? Is it attainable to build a decent website with Blogger?
If you're seeking for answers, you've come to the perfect place. This post will walk you through the whole process of creating a professional-looking website using Blogger for free.
I have gone over each step, from creating your blogger.com account to developing a good-looking responsive website.
As a result, even someone with no experience may grasp and learn how to establish a blog on Blogger.
Before we begin, some of you may be wondering if it is appropriate to establish a blog on Blogger or on WordPress.
Yes, it is quite OK to begin on Blogger. Actually, Blogger is where this website is housed.
And, as a beginner, you should absolutely try Blogger due to its user-friendly interface. Now that your question has been answered, let's get started on the route to constructing your professional website using Blogger.
STEP 1: SIGN INTO YOUR BLOGGER ACCOUCT

The first step is to go to blogger.com and click the "Create Your Blog" button.
Then sign into the Google account you wish to use for your blogging profile; I recommend using a separate Google account than your own for this reason.
You must enter the name of your blog after signing into your Google account. Following that, you have to choose a URL for your blog. When you build your blogger website, you will create a subdomain for blogspot.com (which you may subsequently connect to your bought domain). You must select a URL that has never been used before.
Once you've decided on a URL, click "Next," then enter the name you want to see on your blogger profile and click "Finish." If you're still confused, check out the animation below.

That's it; you've finished the first stage; let's go on to the next.
STEP 2: Create a Blogger Website
After having set up the blog, you should spend some time exploring the various choices in the blogger dashboard. Before you can advance, you must first create your blog.
Select a Blogger Theme
Because the appearance of a blog is so crucial, you should customize the basic Blogger theme. So, how do you go about getting a professional blogger theme?
The explanation is that Blogger gave it for free. Blogger has a variety of templates available for usage; for example, the "Notable" template is a great place to start.
If you want a more complex theme for your blog, look into several theme-provider websites. Hundreds of blogger templates are available on the internet.
To begin, check out Sora Templates; they have a massive variety of blogger templates, and the best part is that most of them are free. So, take your time and select a suitable theme for your site.
You must upload your favorite blogger template after downloading it. To do so, navigate to the themes area of your blogger dashboard.
Personalize Your Blogger Theme
You must customize your blogger theme after installing it. So, go to the Layout Section, remove any extraneous widgets, and then add the widgets you want to your site.
This stage is quite simple on Blogger because there are already numerous widgets available for usage; you simply click on add a gadget and then add the widget you want. To alter the color of your theme, go to the Theme Section and select the Customize option. You may change the color of the different parts of your blog here.
You may change the background colour of your blog and select the primary colour theme. Spend some time customising your blog; it will help you become better acquainted with the Blogger interface and how it operates.
Blogger Favicon Creation and Upload
Have you ever heard of Favicon? Don't worry, a favicon is similar to a logo that appears on the browser tab when you access a website.
Even while a favicon has no direct effect on the site or its performance, it does offer your blog a professional appearance. So, make one for yourself.
You must make a square graphic with an emblem or letter that corresponds to your blog title. Check out Google's favicon, for example. A favicon may be simply created using any picture editor, Canva, or online Favicon makers such as this one.
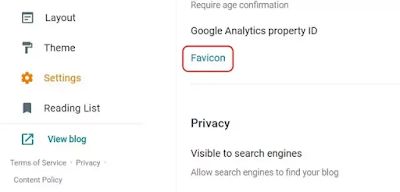
After that, go to the blogger settings and look for the favicon button immediately above the privacy options. Upload your Custom Favicon by tapping the Favicon button.
Step 3: Include Critical Custom Pages
After you've finished configuring your blogger theme, the following step is to add some crucial pages.
This is a critical step that should be completed at the start of your blog. You must develop the following pages: Contact Page, Privacy Policy, and Disclaimer.
You may also include pages such as About Us or Sitemap. Creating a sitemap page allows Google crawlers to crawl your website more quickly.
If you're not sure what to include in your privacy policy or disclaimer, you may get a general idea from our website's policy pages.
You may also utilise online Privacy Policy Generators to establish a Privacy Policy for your website.
STEP 4: Perform Basic SEO on Your Blogger Website
The following step is to perform basic SEO (Search Engine Optimization) on your blog. SEO helps your website rank higher in search engines such as Google, Bing, and Yahoo.
Even though SEO is something you must do all the time (as long as you write), you should perform the fundamental SEO setup on the blogger blog before linking it to the custom domain.
Make Your Blog Search Engine Visible
To perform basic blogger SEO, go to the blogger settings and then write a solid description of your blog.
Meanwhile, make sure the "visible to search engine" option in the privacy settings is enabled.

Add a Meta Description in Blogger
Now, scroll down to the Meta Tags option. Make sure you enable "Enable Search Description" and enter a suitable search description below.
This is highly crucial and is also known as your blog's meta description. When someone searches your blog name on Google or another search engine, it will display underneath your blog URL. So, within 150 words, build a nice meta description that includes the keyword or topic you wish to target.

Blogger Crawlers and Indexing Options
Scroll down to Crawlers and indexing settings for the next section. Enable both custom robots.txt and custom robots header tags before adding the custom robots.txt.
After you link your blog to a custom domain, you may also add custom robots.txt. All you need to do is open custom robots.txt and add these lines. (Ensure that the domain name is changed.)
User-agent: *
Disallow: /search
Allow: /
Sitemap: https://YourDomain.com/sitemap.xml

Custom robot header tags must be included after uploading custom robots.txt. This may appear to be a little complex, so simply follow my instructions. Only enable these tags by category.
Custom robot tags for archive and search pages: no index, noodp
Custom robot tags for posts and pages: all, noodp
Save.


0 Comments